
==> The reason why technicians wear special wrist grounding straps is to Protect sensitive electronic components and computer boards from ESD (electrostatic discharge) damage.
From Wikipedia, the free encyclopedia
http://en.wikipedia.org/wiki/Antistatic_wrist_strapJump to: navigation, search
An antistatic wrist strap, ESD wrist strap, or ground bracelet is an antistatic device used to prevent electrostatic discharge (ESD) by safely grounding a person working on electronic equipment. It consists of a stretchy band of fabric with fine conductive fibers woven into it. The fibers are usually made of carbon or carbon-filled rubber, and the strap is bound with a stainless steel clasp or plate. They are usually used in conjunction with an anti-static mat on the workbench, or a special static-dissipating plastic laminate on the workbench surface.
An antistatic wrist strap with crocodile clip.
The wrist strap is connected to ground through a coiled retractable cable and 1 megaohm resistor, which allows high-voltage charges to leak through but prevents a shock hazard when working with low-voltage parts. Where higher voltages are present, extra resistance (0.75 megaohm per 250V) is added in the path to ground to protect the wearer from excessive currents; this typically takes the form of a 4 megohm resistor in the coiled cable (or, more usually, a 2 megohm resistor at each end). Very cheap wrist straps do not have conductive fabric and instead use the fabric to hold the metal plate against the skin, which can result in reduced ESD protection over time as the metal corrodes.
Wrist straps in industry usually connect to Earth Bonding Points (part of the grounding system) via either a 4 mm plug or 10 mm press stud, whereas personally owned straps are likely to be connected to ground via a crocodile clip.
In addition to wrist straps, ankle and heel straps are used in industry to bleed away accumulated charge from a body. These devices are usually not tethered to earth ground, but instead incorporate high resistance in their construction, and work by dissipating electrical charge to special floor tiles. Such straps are used when workers need to be mobile in a work area and a grounding cable would get in the way, such as in an operating theatre.
Wireless or Dissipative wrist straps are available, but they are widely considered as pseudoscientific hoax products. The claims of the operating principles vary from "Ion Neutralization, Skin Effect, Point Discharge and Corona Discharge Effect" to "Selglard electric halo principles".[1][2]
2. After installing a new computer component why is it important to obtain the most current driver for it?
==> A device driver is a program that controls a particular type of device that is attached to your computer. There are device drivers for printers, displays, CD-ROM readers, diskette drives, and so on. When you buy an operating system, many device drivers are built into the product. However, if you later buy a new type of device that the operating system didn't anticipate, you'll have to install the new device driver. A device driver essentially converts the more general input/output instructions of the operating system to messages that the device type can understand. You need to have a newer version of your device driver because a newer version of a device driver has new features on it.
http://searchenterprisedesktop.techtarget.com/sDefinition/0,,sid192_gci211938,00.html
http://searchenterprisedesktop.techtarget.com/sDefinition/0,,sid192_gci211938,00.html
3. What are the steps required to install a peripheral device?
==>Installing a Peripheral
Adding a new peripheral device that is not-pluggable usually involves the following:
2.Connecting the device to the system
3.Rebooting the systemUse How to Add a Peripheral Device to add the following devices that are not hot-pluggable to a system:CD-ROMSecondary disk driveTape driveSBUS cardIn some cases, you might have to add a third-party device driver to support the new device.
How to Add a Peripheral DeviceBecome superuser.(Optional) If you need to add a device driver to support the device, complete the procedure How to Add a Device Driver.Create the /reconfigure file.# touch /reconfigureThe /reconfigure file causes the Solaris software to check for the presence of any newly installed devices the next time you turn on or boot your system.Shut down the system.# shutdown -i0 -g30 -y-i0Brings the system to the 0 init state, which is the appropriate state for turning the system power off for adding and removing devices.-g30Shuts the system down in 30 seconds. The default is 60 seconds.-yContinues the system shutdown without user intervention. Otherwise, you are prompted to continue the shutdown process.Select one of the following to turn off power to the system after it is shut down:For SPARC platforms, it is safe to turn off power if the ok prompt is displayed.For x86 platforms, it is safe to turn off power if the type any key to continue prompt is displayed.Turn off power to all peripheral devices.For the location of power switches on any peripheral devices, refer to the hardware installation guides that accompany your peripheral devices.Install the peripheral device, making sure that the device you are adding has a different target number than the other devices on the system.Often, a small switch is located at the back of the disk for selecting the target number.Refer to the hardware installation guide that accompanies the peripheral device for information on installing and connecting the device.Turn on the power to the system.The system boots to multiuser mode, and the login prompt is displayed.Verify that the peripheral device has been added by attempting to access the device.For information on accessing the device, see Accessing Devices.
http://www.answers.com/topic/how-to-install-a-pc-peripheral
http://www.answers.com/topic/how-to-install-a-pc-peripheral
4. If a newly installed peripheral device does not function properly what steps can be taken to correct the problem?
==>Check if the product or the hardware you bought has no defect or company defects.
You should also check for driver updates for all your peripheral devices. If you're up to date, and you started having issues around the time you last updated a driver, try backing down to a lower version.
http://www.bautforum.com/archive/index.php/t-62740.html
You should also check for driver updates for all your peripheral devices. If you're up to date, and you started having issues around the time you last updated a driver, try backing down to a lower version.
http://www.bautforum.com/archive/index.php/t-62740.html
5. Explain the technique used to help protect data on a hard drive when doing a clean install?
==>One of the techniques available to help protect data is to divide the hard drive into multiple partitions. With a clean install, many technicians prefer to create one partition for data and a separate partition for the OS. This enables an OS to be upgraded without the risk of losing data. It also simplifies backup and recovery of data files.
6. Explain what a software patch is.
==>A patch is a small piece of software designed to fix problems with or update a computer program or its supporting data. This includes fixing bugs, replacing graphics and improving the usability or performance. Though meant to fix problems, poorly designed patches can sometimes introduce new problems (see software regressions).


 The default settings on the regional and language screen are for the U.S. and English.


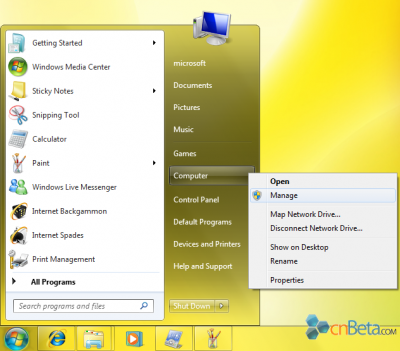


 When you get the message to "press any key to boot from CD...", press any key.( this is new on Microsoft Windows 2000 and XP CD's:if you do not press any key, it will NOT boot from CD-ROM,but boot from harddisk, so that people which "forgot" to takeout such bootbable CD-ROM's are not getting confused bythe CD-ROM installation procedure )
 Once the boot from CD-ROM has started, it will display at the top of the screen :"Setup is inspecting your computer's hardware configuration. . ."
 After a brief delay, the typical Microsoft "blue Installation screen" is displayed, with "Windows Setup" displayed at the top and at the bottom of the screen the information,that "Setup is loading Files" (loading all type of device drivers) :
 It will finally state : "Setup is starting Windows" and will display after a short delay the"Windows XP Professional Setup" or "Windows XP Home Setup" screen :
 Select "to set up Windows XP now" and press the ENTER-key :
 (if you install XP into an already existing partition, you have additional options to leave thecurrent disk formatting intact).Select the type of disk formatting : FAT or NTFS
 The system will then need to reboot :
 ( this is a funny screen : the system will restart anyway after 1 seconds, and you have only the choice to press ENTER to shorten the delay, saving max. 15 seconds in the complete installation process of 30-45 minutes )
